
It is possible to find the 3D coordinates of a target by coordinate measurement. Please input the station coordinate, instrument height, target height, backsight coordinate (or azimuth angle) and azimuth before coordinate measurement.
When measuring the coordinates after inputting the instrument height and target height, you can measure the unknown coordinates directly.
$1· To define the coordinates of occupied point, refer to “6.1 SETTING COORDINATES OF OCCUPIED POINT”.
$1· To define the instrument height and target height, refer to “6.2 SETTING INSTRUMENT HEIGHT” and “6.3 SETTING TARGET HEIGHT”.
$1· To measure the coordinates, you should define the backsight point and measure the azimuth of backsight point first.
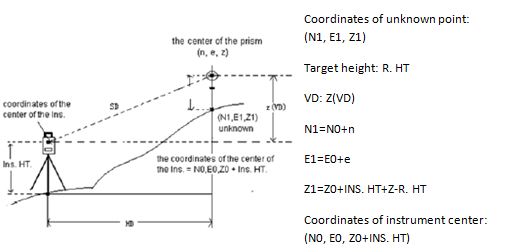
The coordinates of unknown point can be calculated by the formula below:
Coordinates of occupied point: (N0, E0, Z0)
The central coordinates of the target corresponding to the center of the instrument: (N, E, Z) Instrument height: INS. HT
Caution during coordinates measurement: to define the coordinates of occupied point, instrument height, target height and backsight azimuth first.
|
Operation Steps |
Key |
Display |
||||||||||||||||||||||||||||||||||||||||||||||||||||||||||||||||
|
Define Azimuth |
|
||||||||||||||||||||||||||||||||||||||||||||||||||||||||||||||||
|
2) Collimate target B, and press [CORD]. |
Collimate the prism [CORD] |
|
||||||||||||||||||||||||||||||||||||||||||||||||||||||||||||||||
|
4) Start measurement by pressing [F2] (Meas). |
[F2] |
|
||||||||||||||||||||||||||||||||||||||||||||||||||||||||||||||||
|
5) Press [F1] (Save) to start coordinates measurement and record the result. |
[F1] |
|
||||||||||||||||||||||||||||||||||||||||||||||||||||||||||||||||
|
6) You will see as shown on the right window If you want to change the name, press [F2](Clear) and input the point name. |
[F2] Input Point name |
|
||||||||||||||||||||||||||||||||||||||||||||||||||||||||||||||||
|
7) Press [ENTER] to confirm and Save point. |
[ENTER] |
|
|||||||||||||||||||||||||||||
|
After measurement of one point, the system will add 1 to the point name. Repeat the procedures 5~7 to restart a new measurement. |
|||||||||||||||||||||||||||||||
$11 6.1 Setting coordinates of the Occupied Point
By setting the coordinates of the instrument (occupied point) with respect to the origin of coordinates, the instrument can transform and display the coordinates of unknown point (target point) under this coordinates system.
|
Operation Steps |
Key |
Display |
|||||||||||||||||||||||||||||||||||||||||||||||||
|
1) Under coordinate measurement mode, press [F4] (P1↓) to turn to P2. |
[F4] |
|
|||||||||||||||||||||||||||||||||||||||||||||||||
|
2) Press [F3] (STA) |
[F3] |
|
|||||||||||||||||||||||||||||||||||||||||||||||||
|
3) Press [F1](Input) to enter coordinates of the occupied point. |
[F1] |
|
|||||||||||||||||||||||||||||||||||||||||||||||||
|
4) Input point name and coordinate N and press [F4] (Enter) to enter the next value. Input the coordinate E and Z with the same method. |
Input point name and coordinates |
|
|||||||||||||||||||||||||||||||||||||||||||||||||
|
5) After inputting, press [ENT] to confirm and return to setup station interface. |
[ENT] |
|
|||||||||||||||||||||||||||||||||||||||||||||||||
|
6) If you want to use Codes input the desired code. If you don’t want to use codes go to step 7) |
Input code |
|
|||||||||||||||||||||||||||||||||||||||||||||||||
|
7) Press ENT and you will see as the picture on the right. Press ENT to save and finish. Or press ESC to cancel. |
ENT ENT or ESC |
|
|||||||||||||||||||||||||||||||||||||||||||||||||
|
Inputting Range:‐99999999.9999 ≤N, E, Z ≤ +99999999.9999 m ‐99999999.9999 ≤ N, E, Z ≤ +99999999.9999 ft ‐99999999.11.7 ≤ N, E, Z ≤ +99999999.11.7 ft + inch |
|||||||||||||||||||||||||||||||||||||||||||||||||||
$11 6.2 Setting Instrument Height and Target Height
|
Operation Steps |
Key |
Display |
||||||||||||||||||||||||||||||||||||||||||||||||||||||||
|
1) Under coordinate measurement mode, press [F4] (P1↓) to turn to P2. |
[F4] |
|
||||||||||||||||||||||||||||||||||||||||||||||||||||||||
|
2) Press [F1] (Height) to display the instrument height and the target height. |
[F1] |
|
||||||||||||||||||||||||||||||||||||||||||||||||||||||||
|
3) Input the instrument height and press [F4] (ENT) to input the Target height. |
Input Instrument Height [F4] |
|
||||||||||||||||||||||||||||||||||||||||||||||||||||||||
|
4) Input the target height and press [ENT] to confirm and Save |
Input the target height [ENT] |
|
||||||||||||||||||||||||||||||||||||||||||||||||||||||||
|
Inputting Range: ‐9999.9999≤ INS. HT ≤+9999.9999 m ‐9999.9999≤ INS.HT ≤+9999.9999 ft ‐9999.11.7≤ INS.HT ≤+9999.11.7 ft + inch |
||||||||||||||||||||||||||||||||||||||||||||||||||||||||||